Replacing the Priming O-Ring on Eheim Pro II Series Filters by Sergio |
| Notice: Replacing the priming O-ring as described below will void your Eheim Manufacturer’s Warranty! If your filter is still under warranty, consider contacting Eheim for repair options.
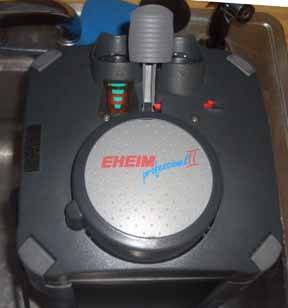
Neither NJAGC or its members take no responsibility for any damage, voided warranties, or any other issues caused by the contents in this article. The NJAGC is not a distributor or reseller of Eheim parts. We do not have o-rings or any other parts for Eheim products. There have been a handful of reports of the priming O-ring failing on the Eheim Pro II filters. This includes the Eheim 2026, 2028, 2126 and 2128. When this O-ring fails, usually the pump head slowly fills with water and begins to leak. The priming O-ring is not considered a user serviceable part, and replacements cannot be purchased directly from Eheim. In addition, the O-ring is not a standard size, so must be custom made. They can be had by special order, but may be pricey unless purchased in large batches. As of the writing of this article, there is only one company that I’m aware of sells replacements marketed toward users of the Pro II filters. See www.atomicrice.com. The NJAGC is not a distributor or reseller of Eheim parts. We do not have o-rings or any other Eheim parts for sale. Take the filter out of your stand and carry it to a place where you’ve got enough room to work. You’ll need to gather a few tools to do the job right. It will be best to have both a #1 and a #2 Phillips head screwdriver. If you don’t have both, just be very careful not to strip out any of the screws. You’ll also want a small flathead and pair of slip joint pliers.
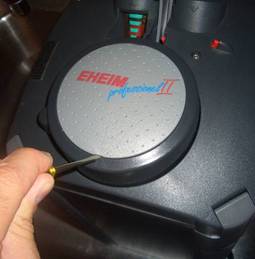
Use your small flathead screwdriver to remove the Eheim cap on the priming button. There is a point on the top and bottom of the button where the screwdriver will fit and can be used to lever the cap loose.
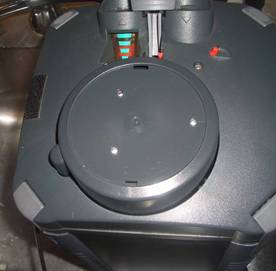
Once the cap is off, three silver screws will be visible. Do not remove them yet.
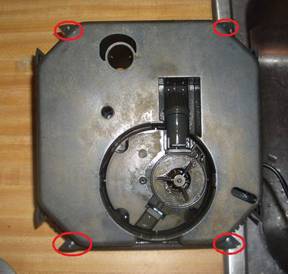
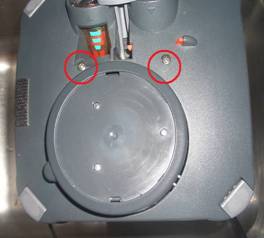
Flip the pump head over and remove the four silver screws from the bottom corners. A #1 Phillips head works best here.
Remove the 2 large screws toward the center of the top side of the pump head. A #2 Phillips head screwdriver works best here. Once removed, you will be able to remove the top cover section. BE VERY CAREFUL ON THE NEXT STEP! The springs below the top cover are strong enough to crack the button if you’re not careful! SLOWLY remove the 3 silver screws on the pump head button. Use a #1 Phillips head. DO THIS SLOWLY, turning each screw a small amount at a time while holding the button down. Remove the button cover.
Remove the 4 priming springs and set them aside.
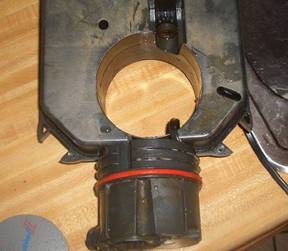
Push the priming button down through the bottom of the pump head and remove the old O-ring (Red in this example). DO NOT install the new O-ring at this point.
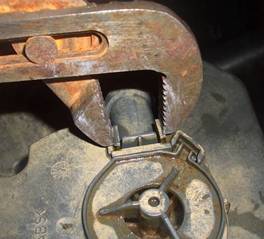
On the bottom of the priming button, locate the shaft labeled “2.”
Using your pliers, gently squeeze the two tabs together and using your finger, pull the whole shaft toward you, removing it.
Now, with the shaft out of the way, you’ll be able to push the priming button all the way back through the hole of the pump head. By installing the O-ring from this direction, you eliminate the pinching issues that arise when the O-ring meets the shaft when entering from the other side!
Lubricate your replacement O-ring with a fish safe lubricant that is also compatible with the O-ring material. Install the O-ring into its groove. There is only one groove that is continuous all the way around the priming button.
Re-install the priming button. Once it gets to the point pictured, push straight downward, carefully, making sure the O-ring is not bubbling out anywhere.
Flip the pump head over and snap the shaft back into place. Be careful not to push the priming button through the hole any further. If the O-ring passes the shaft on the inside, you could pinch it and damage it when returning the button to the proper location.
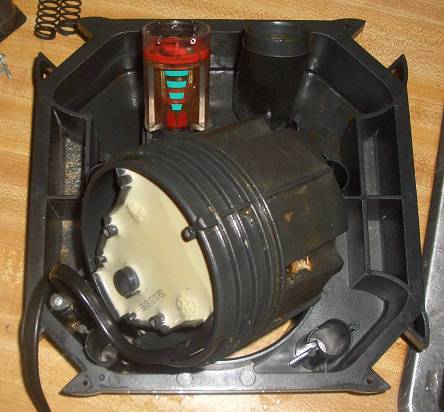
Flip the pump head back over and begin reassembling by installing the 4 priming button springs as shown.
Next, place the cover over the button and springs making sure to orient it correctly so the space for the power cord is in the proper place.
Carefully screw the three silver screws onto the priming button cover, a little at a time each, while holding the button cover down over the springs. Use a #1 Phillips head screwdriver.
Next, return the cover into position and screw the 2 large screws into place using a #2 Phillips.
Flip the pump head over. With a #1 Phillips head, screw the four corner screws to their proper locations.
Flip the pump head one last time and snap the Eheim cap back onto the priming button. Reinstall your pump head to the canister. You’re done!!!
|


Very comprehensive step by step procedure. I replaced my O-ring using these directions approximately 5 years ago. Everything worked perfectly! Thanks for taking the time to document this procedure…Thx!
Wow this kit is AMAZING…SIMPLY FANTASTIC !!! follow the instruction and it will take less than 5 min to fix your filter. I had micro-bubble issue in the Tank all the time….tried the other gasket (Canister Cover and hose intake) and still I had ton of micro-bubbles. But with the priming button o-ring replacement everything is now ok…..
Thank you for this direction. It made the job far easier.
Pingback: Eheim Service and Replacement Questions - Page 2 - The Planted Tank Forum
Pingback: Eheim Service and Replacement Questions - Page 2 - The Planted Tank Forum
Sto ring is damaged where would the leaks show up
IMHO you miss an important thing: the surface inside the cylinder should be carefullly cleaned, as it should the O-ring groove and, once there, all the surfaces. That way, it is even possible to reuse the O-ring, as the problem is sometimes just hardened grease along other debris on the filter, which compromises sealing .
Otherwise, thanks a lot for this magnificient tutorial!. You saved my 2028 😀