| A lot of people who want to start a planted tank have some kind of aquarium and fish keeping experience, but almost none with carbon dioxide (CO2). It’s actually counter intuitive to the old community fish tank, or to “reefers” who want to get into planted tanks. ”Wait, you mean I need to remove that cute bubble wall that helps my fish to breathe? So that I can put in a gas that can kill my fish?”
In this article I’m hoping to shed some light on what components can comprise a full sized pressurized system, and how they fit together.
Now I say “Full Sized” I am referring to a system using a tank with a CGA 320 fitting (To the best of my knowledge, a 5 lb tank is the smallest you can get with that). There are other ways to add supplemental Carbon Dioxide to your planted aquarium. These include Paintball systems (Red Sea makes one), proprietary systems (AGA for example), DIY (Do It Yourself) sugar and yeast mixture systems, and lastly CO2 by Electrolysis (Carbo-plus), however these are beyond the scope of this article although they might share some common components.
Components
Below is a list of components for a pressurized CO2 system. Not all are needed, but here they are:
- CO2 tank
- Washer
- Regulator
- Solenoid
- pH controller
- Manifold
- Needle valve
- Check valve
- Bubble counter
- Bubble counter liquid
- Tubing
- Inline reactor
- Glass Diffuser
- Venturi
- Power Reactor
- Bubble Ladder
- Bell
- Membrane Diffuser
- Drop Checker
Description
OK, now for a brief explanation of what each part does, and how it fits into the system.
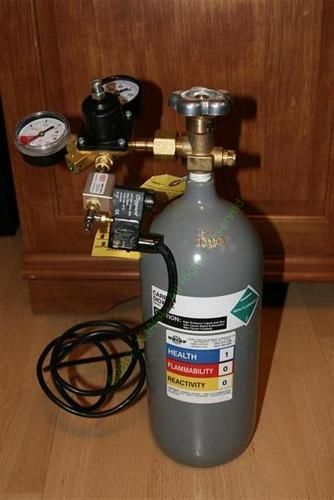
5 lb. Steel tank with regulator
This is what makes the system pressurized. The tank holds liquid Carbon Dioxide, under pressure. They common sizes are 5, 10, 20, and 50 lb. That number refers to the weight of liquid stored in the tank, not the total weight (total weight will be the weight of the liquid plus the weight of the tank with CGA 320 valve). Tanks can be made of steel or aluminum. Aluminum being generally more expensive, but is also much lighter, not prone to rusting, and easier to transport. Now before you go buy one off eBay or some other online retailer, find out where you are going to get it filled. I get my 20 lb refilled at a place that does “swaps”. Some places will fill while you wait. On a “swap” you bring in an empty tank, and they give you a different full one. If you just paid for a nice, new, shiny, light aluminum tank on eBay, you just gave it to that company.
Another thing to consider is that these tanks have to be hydrostatically tested every 5 years to make sure they are not damaged, and can withstand the high pressure needed to keep the CO2 in its liquid form. If you bought one off eBay, you usually have to pay for that test the first time, and will after that. Another possibility is that if the tank fails the hydrostatic test, the tank is done, there is no fixing a failed tank, it’s now a paperweight. So if you are going to purchase a tank online, please ask for the date stamped on the tank.
Places to get them filled are gas suppliers, welding supply stores, beer distributors, and fire extinguisher stores. So before you buy, find out if where you will get your tank filled does swaps or will fill while you wait. CO2 tanks have a CGA 320 fitting to connect to your regulator (here in the US). One other thing I would like to mention is that you should secure your tank in some manner. This is especially true if you have pets, children, or can just have a clumsy episode. If the tank falls, and the valve breaks, you could potentially have a small gas powered rocket. I use bungee cords, either around stand supports or in conjunction with eye bolts.
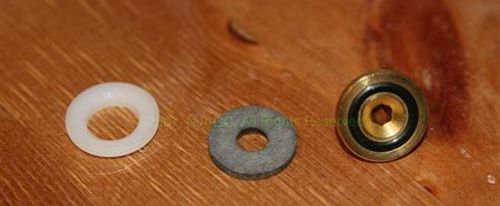
Pictured from left to right Nylon, Fiber, Perma Seal MK I
This is a crucial little part of the system that can bring about a few headaches, so I thought I’d mention it. The washer is the component that makes a “air-tight” seal from the regulator to the tank. Usually I can get a few of the fiber ones for free when I get my CO2 tanks filled. There are a few different types that I’ve come across.
- Fiber – Also known as a Cardboard washer. This is a disposable crush type washer. You use it once, and throw it away when you take thee regulator off. I’ve tried it once, but had a very difficult time removing it as it got embedded into the regulator.
- Nylon – When I ordered my Milwaukee all in one, they gave me 2 of these Nylon washers. Shame I wish I could get more of these.
- Perma-Seal – A reusable washer that is 2 bras discs with a compressable rubber ring. There are 2 Types: MK I which has a stem that needs to be screwed into a threaded fitting, and MK II which is just a flat washer.
NOTE: Applying Teflon tape or pipe dope to the threads on the CO2 tank will NOT seal it. In fact using Teflon on the threads is discouraged as any stray threads getting into your regulator can damage it.
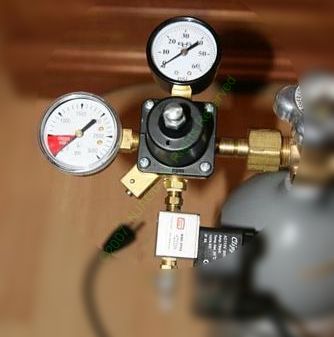 Pictured: Regulator from Rex Grigg with Clippard solenoid, and needle valve Pictured: Regulator from Rex Grigg with Clippard solenoid, and needle valve
Liquid CO2 is under a lot of pressure to keep it in liquid form, about 1000 PSI (Pounds per Square Inch), which will vary with room temp. The regulator is a device that changes the gas pressure from one level (~ 1000 PSI in the tank) to a lower level (~10 – 40 PSI out of the regulator). Regulators can be purchased from about $60 up to and over $125, or you can assemble your own. In addition to some hand assembled regulators available, some of the more popular brands are Azoo, JBJ, and Milwaukee. Regulators should be able to attach to a CGA 320. I have a Milwaukee all in 1 on my 125 gallon tank. I did make some modifications to split the output, but on the whole am pleased with it, and its performance. In the beginning I had some problems obtaining a stable bubble count, but once I turned up the working pressure to about 35 PSI, and used the needle valve to fine tune instead of the low pressure knob (NOTE: the method I just described is opposite to what Milwaukee recommends in their instructions) that problem went away, and it should now help prevent an end of tank dump.
An end of tank dump is a very bad thing. A regulator needs a certain amount of pressure in the tank to work properly.
When the pressure drops below a certain level, some regulators will “Dump” (release) the remaining CO2 in the tank. If not handled properly, this extra CO2 can end up in your tank with disastrous results.
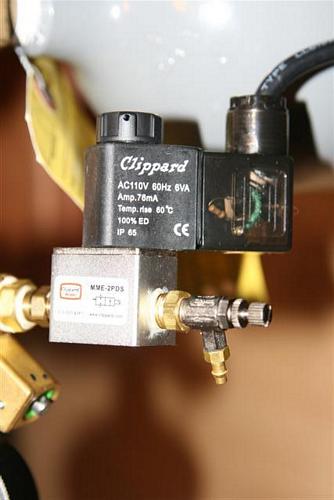
Pictured: Clippard Solenoid & Clippard needle valve
This little electronic device, which is usually purchased with and is attached to the regulator acts as a gate to turn the CO2 on and off electrically. If you were to plug the solenoid into an outlet, you will have CO2 flowing 24/7. Another way is to have the solenoid plugged into a timer that will turn on the CO2 before lights on, and off before the lights. You can also plug the solenoid into a pH controller, for more control.
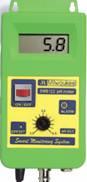
Pictured: Milwaukee SMS 122
This is handy electronic device is used in conjunction with the solenoid. The solenoid is plugged into the pH controller, and the pH controller monitors the pH level in the aquarium via a pH probe. The pH probe goes into the aquarium, and tells the controller what the pH is. The controller checks if the aquarium pH is lower than a value set by you. If it is lower it turns off power to the solenoid shutting off CO2 flow. When the pH rises above the set level, the controller turns on power to the solenoid which turns on the CO2, and should drop the pH.
NOTE: pH probes need to be calibrated, and replaced every so often. If your probe is not calibrated, you can end up not injecting enough CO2 – or worse, injecting too much. The same can also happen if the KH (the measure of carbonate hardness) in your water supply changes, thus adding more buffer.
ALSO NOTE: In addition, please keep the probe wire away from your lighting wiring. I have experienced some pretty strange readings (in the 8 pH range, when it should be closer to 6.6) when my probe wire is in the vicinity of my lighting wiring, and the lights were on.
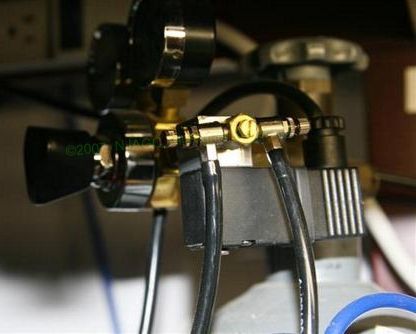 3 port manifold with 2 Clippard needle valves. 3 port manifold with 2 Clippard needle valves.
Manifolds are used to split the output of 1 CO2 regulator to 2 or more lines. I use one on my 125 to split the CO2 to 2 reactors on each end of my tank. If you want to run 2 tanks, or 2 diffusers, a manifold is needed. In my case the manifold is attached to the regulator, which has 2 needle valves each to their own bubble counters, each line into their own reactor. Some people would say “Why not just use a “T” to split the output?”. The reason is gasses will take the path of least resistance, and you will end up with 1 diffuser or reactor getting more CO2 than the other.
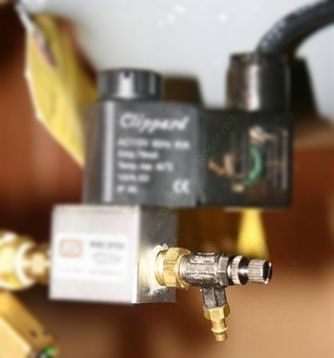 Clippard Needle valve Clippard Needle valve
Allows you to adjust the lower working pressure even lower into something that is more appropriate for an aquarium, and can be usually counted in BPM (Bubbles Per Minute) or BPS (Bubbles Per Second). Usually needle valves are used in conjunction with a bubble counter to see how much of a change you have made. There are also “Metering Valves” which are really an expensive type of needle valve. I picked up a Swagelok B-SS2-A metering valve from E-bay for less than $30 each. These allow much finer control than the stock, or a Clippard needle valve. NOTE: Some needle valves (like the Clippard) can be damaged if you try to use it to shut off the flow of CO2.
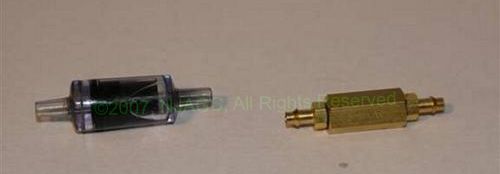
Plastic check valve, Clippard brass check valve
Check Valves stop water from flowing back up into the tubing if your CO2 is shut off or runs out. If water should get into the regulator, it can damage it, and/or drain your tank very slowly. Some people use the plastic airline versions. I did on my DIY yeast generator, but the plastic does become brittle over time, and will leak eventually compromising its purpose. Now I strictly use brass Clippard ones which are more durable.
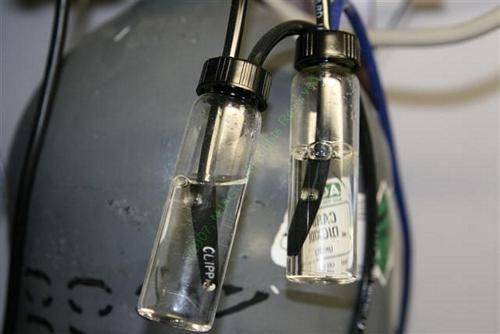 DIY bubble counters with Mineral oil DIY bubble counters with Mineral oil
With some brands of regulator it comes built in (on). I have made some DIY ones from vials found at ‘The Container Store.. They can also be made out of small water bottles. Basically a container is filled with a liquid, and a length of tube from the needle valve goes through the cap into the liquid allowing the gas to rise up through the liquid and into a second tube that is above the liquid line, and out through the cap to your distribution method. Now these are a good indicator for you when adjusting your needle valve. It lets you see how much of a change you made instantly without having to wait to see the effect in the aquarium water. On a DIY system this can act as a gas separator and keep any yeast gunk out of your aquarium.
The 3 most popular ones that I know of are: water, glycerin, and mineral oil. Whatever you use it should not react with the CO2.
Water: Most people can use water with no problems, but when I tried with my Milwaukee all in one, the level would drop over time. Turns out that under high pressure, the water would be minutely (so minutely that there wouldn’t be a water drop, or wet spot under it) pushed out thorough the bottom O-ring. A single wrap of Teflon tape on the bottom threads can fix that, but at the time I didn’t know that and switched to…
Glycerin: A very thick viscous fluid which will make bubbles rise very slowly and easier to count. You might be able to find this at health and beauty aids stores, pharmacies or in Fleet Enema combined with “purified water”. However when I was running about 5-6 BPS the glycerin turned into a frothy meringue like substance. So I tried something thinner which was……
Mineral Oil: Thinner than glycerin, but thicker than water. This worked out very well for me. It can be found in most pharmacies, or in Ikea as wood cutting board treatment.
 Pictured from left: Silicone tubing, Polyurethane tubing Pictured from left: Silicone tubing, Polyurethane tubing
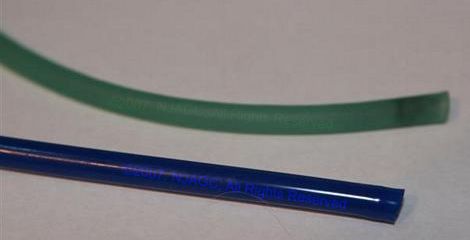
Pictured from top: Silicone tubing, Polyurethane tubing
Provides a path to get your CO2 from the regulator to your distribution method. Some of the types of tubing that can be used are:
- Regular (clear) vinyl airline tubing:Cheap, easy to purchase, however this gets brittle and cracks over time, resulting in leaks
- Silicone airline tubing:Also cheap, easy to purchase, stays soft and flexible, but is slightly CO2 permeable (CO2 can escape through the tubing itself), resulting in a loss of about 6% per foot.
- Polyurethane CO2 resistant tubing:(e.g. Clippard brand) is thicker walled, stronger, not as quite as flexible as silicone, but will last a long time without leaking CO2.
It’s not recommend to try and attach polyurethane tubing to anything glass including diffusers, and bubble counters since the walls are so thick, and rigid. One way around this is to run polyurethane tubing up to the edge of the tank, then put in the check valve, and then use silicone tubing to run underwater to your diffuser. Who cares if it leaks CO2 into the water column? That is what you are trying to do anyway.

AquaMedic 1000 CO2 reactor
The only commercial product I know that fits this description is the Aqua Medic 1000. I was using 2 of the AM 1000s to try and get the CO2 levels I wanted. It didn’t work, so I have since made my own. A DIY one is easy to make with some PVC (Polyvinyl chloride – tubing used in rigid pipe plumbing), PVC cement (PVC specific adhesive), and plastic or nylon hose barbs.
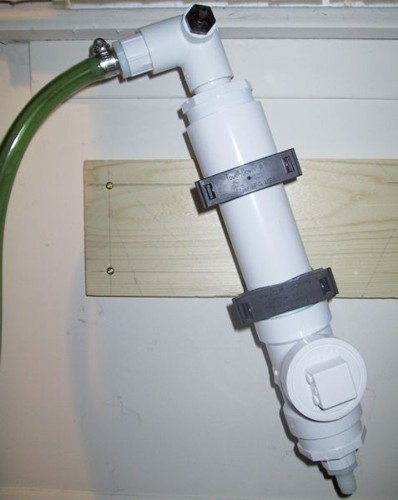
A DIY Reactor
Against conventional wisdom I currently have mine hooked up to my filter input. Basically water flows from the top of the reactor down, A CO2 bubble is released inside the reactor. The bubble trying to rise against the water flow will dissolve it. Some people place BioBalls in their reactor which will slow the water flow, and increase the bubbles contact time (if placed properly), and have a better chance of dissolving the CO2. However these supposedly can clog over time.
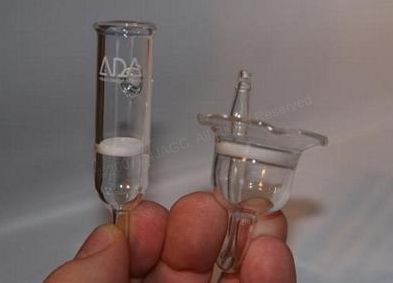
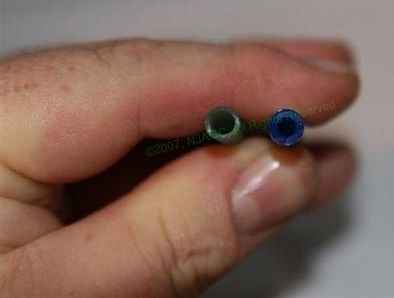
Pictured from left ADA pollen glass diffuser, unknown brand diffuser
Basically it’s a fancy air stone similar to what you would put on an air pump. However they are more expensive, and make smaller bubbles which dissolve the CO2 much easier than a regular air stone. The trade-offs are that generally glass diffusers require more pressure to work than an air stone, and are much more expensive. Place this under you filter outflow so any bubbles that aren’t totally dissolved can be carried throughout the aquarium.
Maintenance Tip: Diffuser discs should never be scrubbed with a tooth brush or any other item, as doing so can damage the disc. Just soak in a 20:1 water: bleach solution, then rinse thoroughly, soak in an overdosed dechlorinating solution (something like Prime or Stress Coat), and I like to rinse thoroughly again.
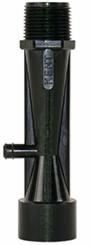
A Venturi is essentially a section of pipe that has a narrow waist and an injection port at the narrow. As water flows through the pipe and the narrow waist it picks up speed, which creates suction at the injection port. The CO2 is broken up into Micro bubbles, and flow into the tank allowing a “CO2 Mist” effect. For the best results, Venturis should be placed where little or no head resistance as the back pressure will create larger bubbles. Venturis can add significant back pressure to the pump that is running it. Mazzei seems to be the gold standard with vanes on the interior of the waist aiding in the dissolving.
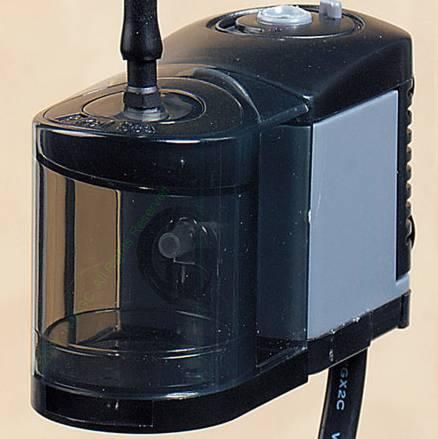
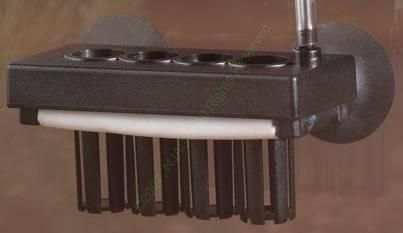
There are manufactured and DIY ones. Basically it’s a power head attached to a tube that can hold a sponge at the opening. CO2 is injected into and chopped up by the power head impellor. The water, with CO2 bubbles, is forced down through the tube, and any large bubbles rise against the flow, other bubbles can be caught in the sponge (if present) until they dissolve. Generally this device is kept in the aquarium, although I’ve seen DIY versions that have the pump externally mounted on the aquarium.
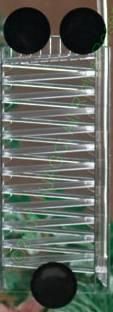
Pictured: NutraFin bubble ladder
Imagine a maze for bubbles. Basically it’s a device that sits in the aquarium, and forces the CO2 bubble to travel a longer distance in the water column allowing more contact time, which will result in more dissolved CO2. Different variations of this can force the bubble to take a zigzag, or circular path. Once again, place this under you filter outflow so any bubbles that aren’t totally dissolved can be carried throughout the aquarium.
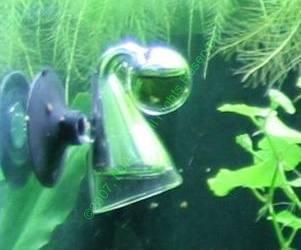
The CO2 bell is probably the simplest, albeit least effective method of dissolving CO2. It’s a container (a bell shape with a large mouth opening will be more effective) placed in high water flow area. CO2 is bubbled up and trapped in the “bell”. The water movement across the mouth will passively dissolve the CO2, and carry it through the tank.
This device operates similar to a bell in that CO2 is held in a high water flow area, and the CO2 is dissolved through the membrane (On one device I purchased it was 2 ceramic tubes). The description states 100% use of CO2, so you won’t have to refill your supply tank as often. Unfortunately I found that in my tank with ~2 BPS in direct flow of my Eheim 2026 I was still getting a large (.75” – 1” diameter) bubble floating up every 2 minutes or so.
Pictured: ADA style drop checker
These are used to provide a visually indicator of the amount of CO2 dissolved in your aquarium. They can be made of glass or plastic, but it does require a transparent portion. You place water (reference solution) along with some drops of bromothymol blue into it. Don’t worry, it’s just your standard pH indicator solution found in most test kits. They can take some time (hours) to give you an accurate measurement of dissolved CO2.
-
How It Works
A drop checker can work because CO2 goes into and comes out of solution relatively easily, and also likes to reach a point of equilibrium (where the amount in the liquid is at the same level as the amount outside the water). So the CO2 comes out of solution from the aquarium water in the airspace above the aquarium water, which in turn is absorbed into the reference solution & pH indicator reaching a point of Equilibrium. The addition of CO2 will lower the pH in the reference solution, and change the color shown. Yellow too much, green good, blue not enough.
How to make it work betterUsing aquarium water as the reference solution works, and gives you an approximation of how much CO2 is dissolved in your aquarium. However by using a liquid with a known KH (usually 4 or 5 degrees), will give you a more accurate reading by negating any other buffering systems in your aquarium. Now, by using the color of the reference solution, and the pH/KH/CO2 chart (this can be found in many places on the internet),you can get a much more accurate, and reliable reading.
|

